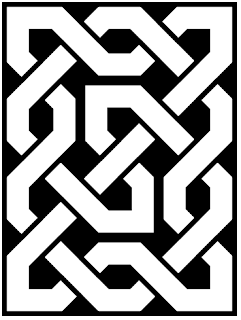
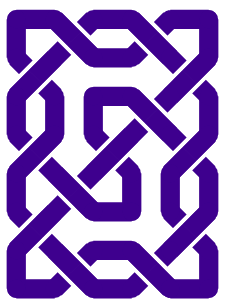
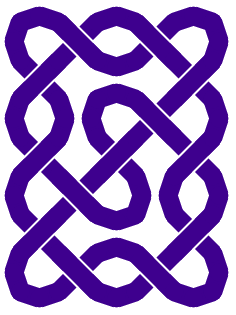
The images above are the same celtic knot pattern (other examples here) shown in three slightly different styles. You can try creating your own knots and seeing how they look in the different styles using this online editor. All the examples above are based on the same grid:
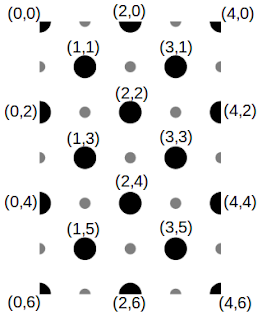
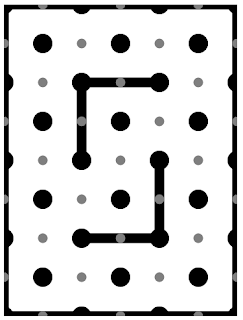
The grid has primary points (shown in grey) and secondary points (shown in black). Breaks in the pattern are created by connecting secondary points following a few rules. The ribbon pattern is then drawn on the grid. The three styles shown are the result of three different approaches to drawing the ribbon once the grid is established.
- The top image is created by filling in the spaces between the "ribbon" of the pattern.
- The middle image is created by following rules that create sections of ribbon around the secondary grid points.
- The bottom image is created by following some rules to create sections of the ribbon around the primary grid points.
All three use the idea of primary and secondary grid points, and creating the structure that defines the patterns by joining up the secondary grid points. So the first steps of all three approaches involves setting up this basic structure. Here are those steps, adapted from this earlier post.
Setting up the grid and pattern structure
1) define primary grid points
A knot pattern is laid out on a square coordinate system using a set of "primary" points that are set at one unit distances in the horizontal and vertical directions. We'll say that (0,0) is the top left corner of the grid, and the positive x direction is towards the right and positive y direction is down. The dimensions of the primary grid must be odd (there must be a total odd number of dots in both the x and y directions). Because we are starting with (0,0) in the top left, the top right point (x, 0) must have x even (4 in the example below), and the bottom left point (0,y) must have y even (6 in the example below).
the primary grid
2) identify secondary grid points
Some of the points on the grid are special - these form a secondary grid. The special secondary grid points are those where both x and y values are even, or both are odd.
the secondary grid
The secondary grid points where both x and y are even will be referred to as even nodes, and those that have both x and y odd will be referred to as odd nodes. The requirement to have the primary grid have odd dimensions (step 1) was needed to ensure that the corners of the pattern are all secondary points.
3) place boundaries
To create an edge-boundary for the pattern, and to create more interesting twists and turns, we follow some rules for drawing boundaries on the grid.
boundary rule 1: A boundary can connect any two non-diagonally adjacent secondary points, as long as rule 2 is not violated. The midpoint of a boundary segment will be a primary point.
boundary rule 2: A primary point cannot have more than one boundary going through it.
The example below shows boundaries drawn along the edge of the image, as well as some internal boundaries.
legal boundary examples, showing
primary and secondary points
primary and secondary points
Three ways to draw the "knot"
Now that the grid is drawn with primary and secondary points, there are different approaches to actually creating the celtic knot pattern from the grid.
method 1: Negative space around the secondary points
To create an intertwined ribbon we can fill in the spaces around the ribbon - in addition to the boundaries already drawn, the secondary grid points are built up into polygons, and the "weaving effect" is created by drawing filaments that extend out of the secondary grid polygons, in one direction for even secondary points, the opposite for odd secondary points.
If an adjacent primary point has a boundary through it, the line extending from the secondary point in the direction of that primary point is simply not drawn, and the corner of the polygon without a line extending from it is truncated.
A square is drawn around each secondary point, and
where there is no barrier, lines are extended based on the
even-odd rules.
where there is no barrier, lines are extended based on the
even-odd rules.
Squares with missing lines can be
truncated into polygons to improve
the ribbon effect.
truncated into polygons to improve
the ribbon effect.
(Note: This post offers a slightly different description of method 1.)
method 2: Ribbon sections around the secondary points
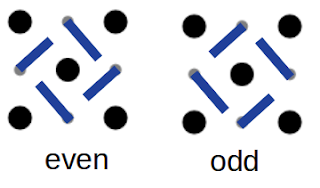
Let's forget about the method above, and go back to the grid. Instead of filling in the spaces between the ribbon, we can draw the ribbon itself by drawing sections of the ribbon around the secondary points. Again, there is an even/odd rule in order to allow for the ribbons to pass over each other. For the node in the center, the following patterns are followed:
Adding partial paths around a secondary
node following even-odd rules
node following even-odd rules
When these are joined together, the ribbon fragments form a set of continuous paths, and weave over and under each other:
portions of ribbon either join
together or appear to pass over and under
together or appear to pass over and under
If one of the primary points surrounding the secondary point has a boundary through it, the fragments are bent and joined:
An even secondary point with a
boundary through its bottom primary neighbour.
boundary through its bottom primary neighbour.
Connecting all the lines and erasing the points and boundaries, we get something like the image below.
method 3: Ribbon sections around primary points
One final time, let's go back to the blank grid and re-draw the ribbon in a different way.
For this method, we look only at primary points that are not part of the secondary grid. This includes primary points that have (x,y) values where x is even and y is odd, or where x is odd and y is even (remember, secondary points have both x and y values even or both x and y values odd).
Like method 2, ribbon fragments are drawn, but this time the focus is on the primary nodes. again, what is drawn is different based on an "even vs odd" rule:
Lines across the primary points are drawn
using even vs odd rules
using even vs odd rules
Dealing with boundaries is easier with this method, there are only two cases to consider - a vertical boundary or a horizontal boundary.
There are two cases for handling boundaries
with this method.
with this method.
Any ribbon fragment that would lie outside the boundary of the grid is not drawn. Connecting all the lines and erasing the points and boundaries, we get something like the image below.
These three methods are pretty equivalent - small style alterations in any one of them can make the resulting knot look identical to one drawn using another method. When drawing knots by hand, I find that something along the lines of method 1 is easiest to use; however, from implementing each of the above in simple programs, I found that method 3 was the simplest to code.
Other Knotty Things
Other posts:
Online editor: https://dmackinnon1.github.io/celtic/


